Tuesday, June 5, 2012

Window assembly


The front door

In this post I will cover the fabrication of the exterior window frames and then back to the stairwell as the wallpaper is applied.

A quick check to make sure the front door fits in the entryway. The gray ares will be brickwork and the plain wood will be painted white.


Ground floor bay window with sill


Staring with the sash window kits, I removed the stock sill to leave the basic frame. For the ground floor I used 3/8" MDF that will be painted with a buff sandstone finish. the first and second floor windows use mo;ding that will be painted white. Here is one side of the window casing built up with strips of trim.  


First floor window with bare framing
The first piece of trime was planed flush with the corned of the bay window and then the second piece was added. I filed the edge to create a mitered corner. The window header was installed in the same way. Blue painters tape has been indispensable in holding pieces together as the glue dries.


Wood filler to fill the gaps


I used wood filler to fill any gaps with the goal to have the window framing look like an integrated piece. The arched headers were hand carved and then the keystone added on top.


Window frame after sanding


Finished bare wood casement 


I made the corbels at the base of the arches from a strip of based board. I filed the edges to get a mitered joint and then used wood filler to fill in where the fit was less than perfect.


Completed first floor window with molding cap


All four panels that make up the front of the house. I will also add moulding at the joint between the ground and first floors to disguise the horizontal split and also along the top edge to merge with the roof. Now I need to make a few hundred brick slips to decorate the gray base.


Second floor landing
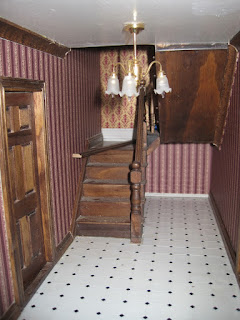
I hope to have the interior finished by Genevieve's birthday which is rapidly approaching. Here are pictures of the stairwell with the wallpaper installed. The baseboard still needs to be glued on to finish the landings. Wall sconces on each of the landings will illuminate the stairs.


First floor entry hall


Ground floor hallway


Second floor landing with
completed based board


Genevieve waiting patiently


The next task will be to wallpaper the rooms and add the wainscot, chair rails and picture rails.


Genevieve has been practicing her archery when not helping with sanding, polishing and providing creative input. She now knows how to make her point.


Sunday, April 22, 2012

Floors, lighting and fireplaces


Hallway for main entry
With the basement lights installed, it was time to move on to the first floor. This will be the main entry. The hallway flooring is marble paper which is why I put the wire for the basement hallway in a conduit and smoothed over with plastic wood filler.


I decided to use walnut veneer for the floor in most of the upper floor rooms. I bought a 250' roll of edge veneer with heat sensitive glue. The roll was 3/4" wide, so to make planks, I cut the roll in to 12" long strips and then cut the strips in half lenghtwise so the strips would scale as 4 1/2" wide. 


Living room floor
I used a 12" length as the rooms are 15" deep, so as I laid the strips, I would get a 3" stagger between adjacent joints. Once all the "planks" were glued down using an iron, I trimmed the edges flush with the subfloor and sanded the entire floor.  I used furniture wax polish to  finish the floors. The first coat of wax was applied very generously and rubbed in. To speed the absorption, Andrea had the idea to melt the wax in using a hairdryer. This greatly helped the wax penetrate in to the floor. A second coat of wax was applied and again melted in with the hairdryer. Then a final coat of wax was applied and the floor was allowed to cool overnight before polishing with a soft cloth the next day. The three layers of wax and the heat treatment gave a deep, shinny finish that can be repolished as needed.


5-arm chandelier in the living room
Genevieve choose a blue and gold peacock pattern wallpaper for the living room. To match the paper, I painted both the ceiling coving and rose in blue and gold over a white base. The picture rail will be gold. A five-arm chandelier is attached to the ceiling rose.


Dining room floor


The floor for the dining room was finished with walnut veneer planks. Genevieve selected a green damask paper for the dining room so the coving and ceiling rose are painted green. I used two shades of green for the ceiling rose, matched to the green shades of the paper


6-arm chandelier in the dining room


Dining room with painted coving ready to be installed


Second floor hallway


The second floor hallway has walnut veneer planks and the same three-arm chandelier as the main hallway. I installed the flooring before the doors so I didn't have to cut the flooring around the door frames.


Library floor partly finished
The library is on the second floor. Here are the walnut planks before sanding and waxing. I kept the wires for the light covered with tape until the planks were up to the channel cut in the floor. I then removed the tape and laid a veneer strip over the wire in the channel. The veneer is stiff enough so after sanding and waxing, you can't see any dip in the floor.


Finished library floor


I used gold trim as a unifying theme for the ceiling roses in the library and main bedroom. The library will have a walnut wainscot and beamed ceiling.

Library lamp in the library (of course)


I used a slightly different pattern for the gold detail on the ceiling rose in the main bedroom. The blue tabs were markers to center the rose on the ceiling.

3-arm chandelier in the main bedroom


The main bedroom also has gold details on the ceiling coving and maybe the picture rail.

Main bedroom


Bathroom floor


The bathroom floor is an embossed plastic sheet with a white and black tile pattern. As the sheet was slightly translucent, I covered the wire channel in the floor with a strip of white pvc tape before gluing the flooring down.


Top floor hallway


Trying to install the top hallway flooring around the railing resulted in a few hits that knocked the railing loose so I removed it. As suggested by experienced dollhouse builders, next time I would install the stair railing after the finishing floors and stair runners.


The three fireplaces


Once all the floors were finished, I moved on to the fireplaces. I glued brick paper in the backs and used marble paper for the hearths. 


Library fireplace
Dining room fireplace
Living room Fireplace


The front panels stacked with windows installed


Here are the four panels that will make up the front of the house. Making the lap joints to fit the mullions in to the windows frames for the center bay window over the doors needed some care. 


Inside of bay windows


The window kits came with only plain wood trim for the interior window sills. I decided to build custom window sills to look more like real windows, but also to create a continuous sill to unify the three window frames in to a single unit.

Blue masking tape holding window sills in place


A little plastic wood was needed at the window sill joints to fill in small gaps. Once sanded and painted, the bay windows should look like a combined unit. To be able to ands into the corners I need to buy some riffler files. Once they arrive, I will post some more pictures as I finish the interior of the window and more on to the exterior.

Completing the window sill joints


Saturday, February 25, 2012

February 24, 2012 Basement floor lighting

Finally a chance to add the newest photographs with the lights installed in the ground floor rooms.

Ground floor hallway with ceiling light


Here is the ground floor hallway with the back of the house in place. The back is loose as I will need to remove it to drill holes for the stairwell lights on each landing.


Wire in aluminum conduit across 1st floor hall


As there floor in the first floor hallway will be marble paper, I needed to fill in the groove for the ceiling light below so it won't show. In case I need to remove the light, I put the wire in an aluminum conduit and then filled the groove with plastic wood. The other rooms will have strip walnut veneer flooring and I don't expect  the wire groove will show through the wood veneer.

Utility room with double lamp


This is the utility room. I decided to position the lights so you can see the complete fixture from the front, even though the room is deeper than it is wide.

Kitchen with double shop counter fixture
The lights came with foam pads to stick them to the ceilings. I removed the foam as I did not like the look of the foam. With rigid mounted lights I have to be very careful not to not them loose.


View of the house with the back panel


Here is a picture of the dollhouse with the  back in place. I will alternate the installation of flooring and lights so I cover the wire groove from the floor below but without needing to avoid the light in the current room. When the lights are on chains, I could move them out of the way or tape them to the ceiling while decorating the room.


 Main left panel for the front of the house


I have started to install the bay windows in the front panels of the house. All the windows have working sashes. I waxed the frames to easy moving the sashes up and down.


Skiing at Alpine Meadows, Tahoe CA


Spent the week in Tahoe enjoying the limited amount of snow so not much progress on the house this week. Genevieve, the eventual owner of this house, is closest to the camera.

Monday, February 6, 2012

Dollhouse Part 1

Loose pieces taped together


Back view


So, after Genevieve fell in love with an incredible dollhouse on display in Harrods, several months of planning and several weekends, I finally had the shell in pieces. To check the fit, I taped them all together and to my great relief, they all fit together. To give an idea of size, the house is 36" wide, 40" tall and 15" deep.


Roof with dormer window

Front bay widows


Some of the windows and 
doors loose fitted


Just to give Genevieve an idea of what it would look like I fitted some of the windows and doors while it was taped together. Next was to add the floor extensions for the bay windows and start gluing.


Walls and floors glued together


3/8" MDF used for all the framing


To keep everything square when gluing the walls, floors and partitions, I screwed the back panel in place. Once everything was dry, I removed the back so I would access the install the 180 degree stairs.


Three flights of stairs installed


The stairs were made from a stair kit. To make the landing I had to cut the stairs in half and then make a landing using the middle step.


I wanted the stairs to wrap around the back of the hallway to leave space for the door to the rooms. To make the newel posts work with the landings, I had to extend each  one so the banisters would line up when using the spindles that came with the stair kit.


On the top floor (attic) I created a landing to provide some space. I offset the newel post from the wall so I could fit wall paper behind later without having to try a trim the paper to match the shape of the post.


Top flight of stairs to the attic


Once the stairs and railings where in, it was time to install the stair runners and rods. To fit the carpet around the landings, I glued the carpet down and then cut at 45 degrees so the boarder would be continuous. The installation of the stair rods was a little fiddly so if I did this again, I would install the stair carpet and rods before the banisters. To fit the rods, I predrilled holes for the rod holders using a mini drill, using a guide to keep the spacing constant.


Stair runner and rods installed


With the stairs mostly done, I decided to move on to the ground level. Along with the lower entrance, the ground floor has the kitchen and utility room. The utility room has french doors that will ultimately lead to a conservatory and then out into the garden.

Ground floor hallway with black and white tile


To match the staircase, I decided to stain all the time in the hallways a medium walnut, with the trim in the rooms painted white. (Yes , I did have to remove the trim in the picture below with the correct white trim). The tile floors a embossed PVC sheet tiles using black and white tiles in the hall way and terracotta tiles in the kitchen and dining room. 

Kitchen with terracotta tile floor 


 Below is a picture of the utility room with the french doors leading to the (future) garden.


Once the floors were in I could start with the baseboard. Again, walnut in the hallway to match the stairs and white in the rooms. When installing the stairs, I added a 1/8" shim to offset the treads from the wall so I would have the space to install the baseboard behind the treads in a strain run.


Ground floor hallway with tile and base board


On the first and second floors, I am using a lager base board  to go with the taller ceiling height, 10" compared to 9" on the ground floor.


First floor stair landing with base trim


Once I install the ceiling lights in the ground floor rooms, I can move to the first floor. The hallway will have a marble pattern and the adjoining parlor and dining rooms will have walnut strip floors. I bought a 250' roll of iron-on walnut veneer edge trim to do all the floors. Once I cut the 3/4" strip in half, I will have 4 1/2" planks at 1:12 scale. All the stained wood is waxed for protection and to give it a slight sheen. Genevieve has been a great help when it comes to waxing all the small parts.


To give Andrea credit, here she is painting all the window trim pieces that will be used to make up the bay windows.


Once the winnows are ready, it will be time to put the front of the house together, so here is a preview of the doors.


Main door and lower entrance


More after next weekend, assuming it doesn't snow.